Monday, January 30, 2012

Chicken Sausage on the Cheap


Our local grocery had a massive sale on chicken this week. Chicken sausage, however, remained ridiculously expensive. What's a girl to do??

 Break out the Kitchen Aid. 
The whole 6 lb roasting chicken was deboned (which took me far too long. Next time I'm finding a how-to video) and run through the larger of the two grinding plates.

Voila! Ground chicken. Since I don't have any casings for sausage, I put up two bags of plain chicken to season later for use in Asian inspired meals. Mmmmm.

The rest got a bit of seasoning tossed in.


Onion, apricots, garlic powder, salt, pepper, sumac, ginger... just whatever was in the spice cabinet.

Toss it in and mix it up.


Run it through the grinder again (still on the large plate).


It was an incredibly funny thing to watch. My arms were pretty much up over my head, trying to shove meat into the grinder. For the next several day, my shoulders and neck ached! Next time - I'm getting a stool.


Nicely ground. Phew! I'm ready for dinner.


I tossed in some olives and served it over couscous. Mr. S had no problem eating a large portion of it. Even when I put roasted veggies on the plate!


Friday, January 27, 2012

Last of the Bay


Happy Friday! I'm excited for the weekend. Mind you there was a slight mix-up and I thought the Super Bowl was this weekend. It is not. However, I'm still glad that we have the weekend to play! Mr. S flies to Denver for a few days next week. Leaving me alone in the kitchen. Possibly not the smartest idea.....

Anyhow, here are the last of my awesome photos from the aquarium. Enjoy!


Otters - my mom loves them! And at 10:30 they feed them. Oh the cuteness!


Sea dragon, sea horse, and eels - oh my!

Hope you enjoyed your brief aquarium tour. Back to the cooking and crafting next week!

Thursday, January 26, 2012

It's a Jelly Forrest!


One of the cooler things that I did in Monterey was the Monterey Bay Aquarium. It was expensive ($30 for a student - $50 for a student year-long membership), but it was worth it. I look forward to coming back often in 2012.


 The jellies were one of my favorites - they always are. I think it's something about the colors, the delicacy and the grace. And the fact that if you touch them, they kill you. Intriguing, no? 


We got back to Santa Clara yesterday afternoon. I've got ginger syrup on the stove, which means I'll be needing to pick up club soda from the store today. Along with hot dogs. Don't ask, it's a comfort food thing. I'm happily back in my little home world. Slippers on my feet, coffee (with real milk! not yucky creamer) in my cup, and things on the stove. I like it here. It's nice.


ps. I know this goes without saying, but all photos are mine - aka copyrighted by me. If you want to use one, ask.

Wednesday, January 25, 2012

Where I've Been


Mr. S had a conference in Monterey that started early Sunday morning. We drove down Saturday. It was mostly gloomy for the first half of the week. I did spend plenty of time on the beach, reading.

I've plowed through a magazine and book and a half. The magazine was Garden & Gun the "soul of the south" they like to say. I think they are pretty close to capturing it. The pages are beautifully designed and the stories have been greatly crafted. The books are from author Dai Sijie. I've finished Balzac and the Little Chinese Seamstress (which apparently is now also a movie) and Once on a Moonless Night. I highly recommend both. I'm about halfway through Mr Muo's Travelling Couch which I'm also quite enjoying.

Tomorrow, to make up for my Monday absence, I'll post pictures from the Monterey Bay Aquarium. Trust me, they are worth it.


Friday, January 20, 2012

Chile Rellenos con Chorizo


Eat your heart out El Mexicano Restaurante.

While Mr. S and I were at the Most Wonderful Mexican Grocery in the World the other day, he picked up some pasilla chiles, which are on the same page as poblanos. In our house, though, these peppers have a different name - death peppers.

You see, last year, after going to a similarly wonderful store in Maryland and purchasing said peppers, I made a massive mistake. I tried to clean them, raw. 

I nearly died you guys. It was bad. Mr. S found me on the floor of the kitchen, rolled up in a little ball, gasping, crying, and in a general hot mess. 

FOR THE LOVE OF GOD - DO NOT CUT INTO THESE PEPPERS WHILE THEY ARE RAW. And don't run them, raw, under water to try to get the seeds off either. The capsasin creates an air-borne lethal weapon. You will die.

So, here's what you do to achieve the beautiful chile relleno pictured above: Roast the Dickens Out of Them.

Turn the suckers black. Puffy. Crispy. Then sweat them in a bag for 10 minutes, so all the nasty capsasin goes away. Then, you can peel all the skin off and get the seeds out.

You are left with this. Glorious!

Obviously you want to fill those beauties with chorizo.

This is the kind we found. It's the store's own recipe for "Chorizo del Puerco" and has some interesting spices. I think there's a heavy hand of cinnamon in there among other things.

Here it is all fried up:

Now, throw in a packet of Sofrito, a bit of diced onion, and some rice.

Try to not eat it all. 

Then you put a layer into your peppers, add some cheese, and layer a bit more rice on.


Looks pretty good right?

Now you pull the pepper together, compact that rice mixture, and jab forcefully with toothpicks.

Like so:

Dump that sucker in a airy egg batter and toss into some screaming hot oil.


Turn over once, and let brown. You're ready to plate!


Chile Rellenos con Chorizo
Serves 4
Batter adapted from Carla Rodriguez

For the peppers:
4 pasilla peppers, charred
2 c. cooked rice
1 link or about 5-6 inches of Mexican pork chorizo
1/4 c. diced red onion
1  4oz packet of sofrito, or 8 Tbsp jarred sofrito
3/4 c. cheddar jack cheese, or the Mexican blend
Salt and Pepper to taste

For the batter:
2 eggs, separated (yolks in a small bowl, whites in a bigger bowl)
1 Tbsp flour
Pinches of salt and pepper

Once the peppers are charred and black (you can either hold them over your gas burner or toss them in the oven for awhile), put them in a plastic bag, sealed, for 10 minutes to sweat. Then, peel the charred skin off the peppers, and any other shiny skin you see. With a sharp knife, make one slit down one of the sides. Remove the seeds and veins, being careful not to rip the pepper. Rinse the pepper under cold water to make sure all the seeds are gone.

Brown your chorizo in a medium saute pan. Toss in the onions and the sofrito. Cook until the onions are just soft. Toss in the rice and mix together. 

Lay out the peppers as seen in photo #2. Place a wooden-spoonful of rice onto the open pepper. Add a layer of cheese, and top with another spoonful. Bring up the sides of the pepper and gently press down to compact the rice. Hopefully, the top of the pepper sorta comes together. Insert toothpicks to keep the pepper closed. Count them and make sure you know how many you put in. You need to take that many out. Repeat for the other 3 peppers.

To create the batter, separate your eggs. Whisk the whites until they are frothy, almost soft peaks. whisk in the flour, yolks, and seasoning. 

Gently dunk your peppers into the batter and slide into a pan of screaming hot oil (1/4 c. vegetable oil and a medium saute pan should work). When the batter on the bottom browns, gently flip over with a spatula. Once that side had browned, remove from pan and remove toothpicks. Hope you got them all!

Dress with queso fresco, cilantro, and some guacamole. Eat!


Wednesday, January 18, 2012

Sew Awesome

In the second bedroom of our little apartment I've set up a craft area. Not that I use it.

Exhibit A: The love seat in the living room.


My saint of a husband has decided that it's "cute" that I craft. And he hasn't said a word about the mess...


I've been drafting up various patterns for embroidery purposes:

And trying my hand at creating kitchen towels with a little bit of fun!


Any suggestions for future patterns?

Monday, January 16, 2012

Mexican Lime Meringue Pie


On Sunday, after church and a quick trip to Ikea, Mr. S and I stumbled into the most wonderful Latin American grocery store in the world. 

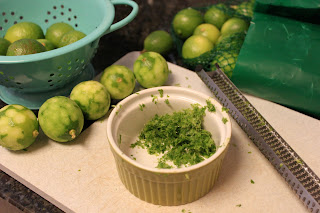
I was immediately drawn to the bags of "Mexican Limes." They were small, the size of key limes, but a deep green. Mr. S made a bee-line for the piquillo peppers (more on that later) and we both tossed a few other things into the basket.

As soon as we got home with our treasures, the gears began turning. While poor Mr. S was telecommuting to the office, I got to play in the kitchen. Pie time!


First, to tackle the limes. Zest of 8 and juice of 10. But oh so worth the inevitable carpal tunnel!


Now, everything in the bowl and a quick mix with my new best friend the hand mixer.


Looks pretty darn good, huh? You should see the limes...


It was a massacre! Much like the poor bananas from the Afternoon Muffins. Perhaps fruit should have a greater fear of me.

Next up, crust! Graham crackers (mine happen to be the low-fat variety. How is that even possible?), coconut, brown sugar and butter. 
Spin, spin, spin...

Into the pie plate and oven, to a light golden brown.

Add that filling!


While that's cooking, you might as well get started on the meringue.


Once it's done, the only difficulty is keeping Mr.S's fork out for the requisite cooling time!


Mexican Lime Meringue Pie
Adapted from Bobby Flay's Key Lime-Coconut Pie, and meringue from Allrecipes

For the Filling:
1 1/2 Tbsp Mexican lime zest
Just over 1/3 c. Mexican lime juice
4 egg yolks
1 can (14 oz) sweetened condensed milk
1 tsp vanilla

For the Crust:
8 1/2 whole graham crackers
1/4 c. sweetened flaked coconut
1 1/2 Tbsp brown sugar
6 Tbsp butter (cold and cubed)

For the Meringue:
4 egg whites
1/3 tsp cream of tartar
7 Tbsp sugar, separated
Coconut for dusting 

Preheat your oven to 325 degrees. Find your glass 9" pie plate.

Make the filling first - Beat zest, juice, yolks, sweetened condensed milk and vanilla together in a medium sized bowl until smooth - a minute or two. Cover and set aside for about 20 minutes (the time it takes you to make the crust and bake it off).

In a food processor, blend the graham crackers, coconut and sugar together until finely ground. Then add the butter and pulse until it just comes together. Pour into your glass pie plate and press into shape, coming all the way up the sides. Put in your 325 degree oven for 10 minutes. 

Once baked, take the crust and pour in the filling, which will have thickened up a bit. Put back in the oven for 10 minutes. 

Beat the egg whites and cream of tartar in a large bowl until soft peaks form. Add the tablespoons of sugar one at a time, beating after each addition, until you get firm, glossy peaks.

Once the filling and crust are out of the oven, bump the temperature up to 350. Top the pie with meringue (use the back of a spoon or your finger to make the peaks all over), sprinkle with coconut, and send it back in the oven for 10-13 minutes, or until the meringue browns to your liking.

Cool on a rack for an hour and then refrigerate for at least 3. If you can wait that long.