We live in this awesome apartment complex that happens to have a historical house on the property. It's one of James Lick's (of Lick Observatory fame) houses.
The house has a few citrus trees around it. And those citrus trees actually grow fruit! I'm not sure if I'm allowed to pick it. But that hasn't stopped me yet.
Aren't they gorgeous? I'm not sure what kind of lemons these are - maybe Meyer? The lemon skin is really loose, and is easily peeled off. I have no idea what that means.
In any case. What does one do with lemons? Why, make cake!
Start off with the butter and sugar. Cream away!
Add the eggs one at a time. I mean it. One at a time. Beat completely after each egg goes in.
Then the baking soda gets mixed into the sour cream.
Pour half the sour cream mixture into the batter bowl. Add half the flour too. Beat well.
Then add in the rest of the flour and sour cream, along with the vanilla, lemon juice, zest, and coconut.
Mix well.
Pour into well-greased bunt pan and top with coconut.
Bake for 1 hour and 20 minutes.
Cool and serve!
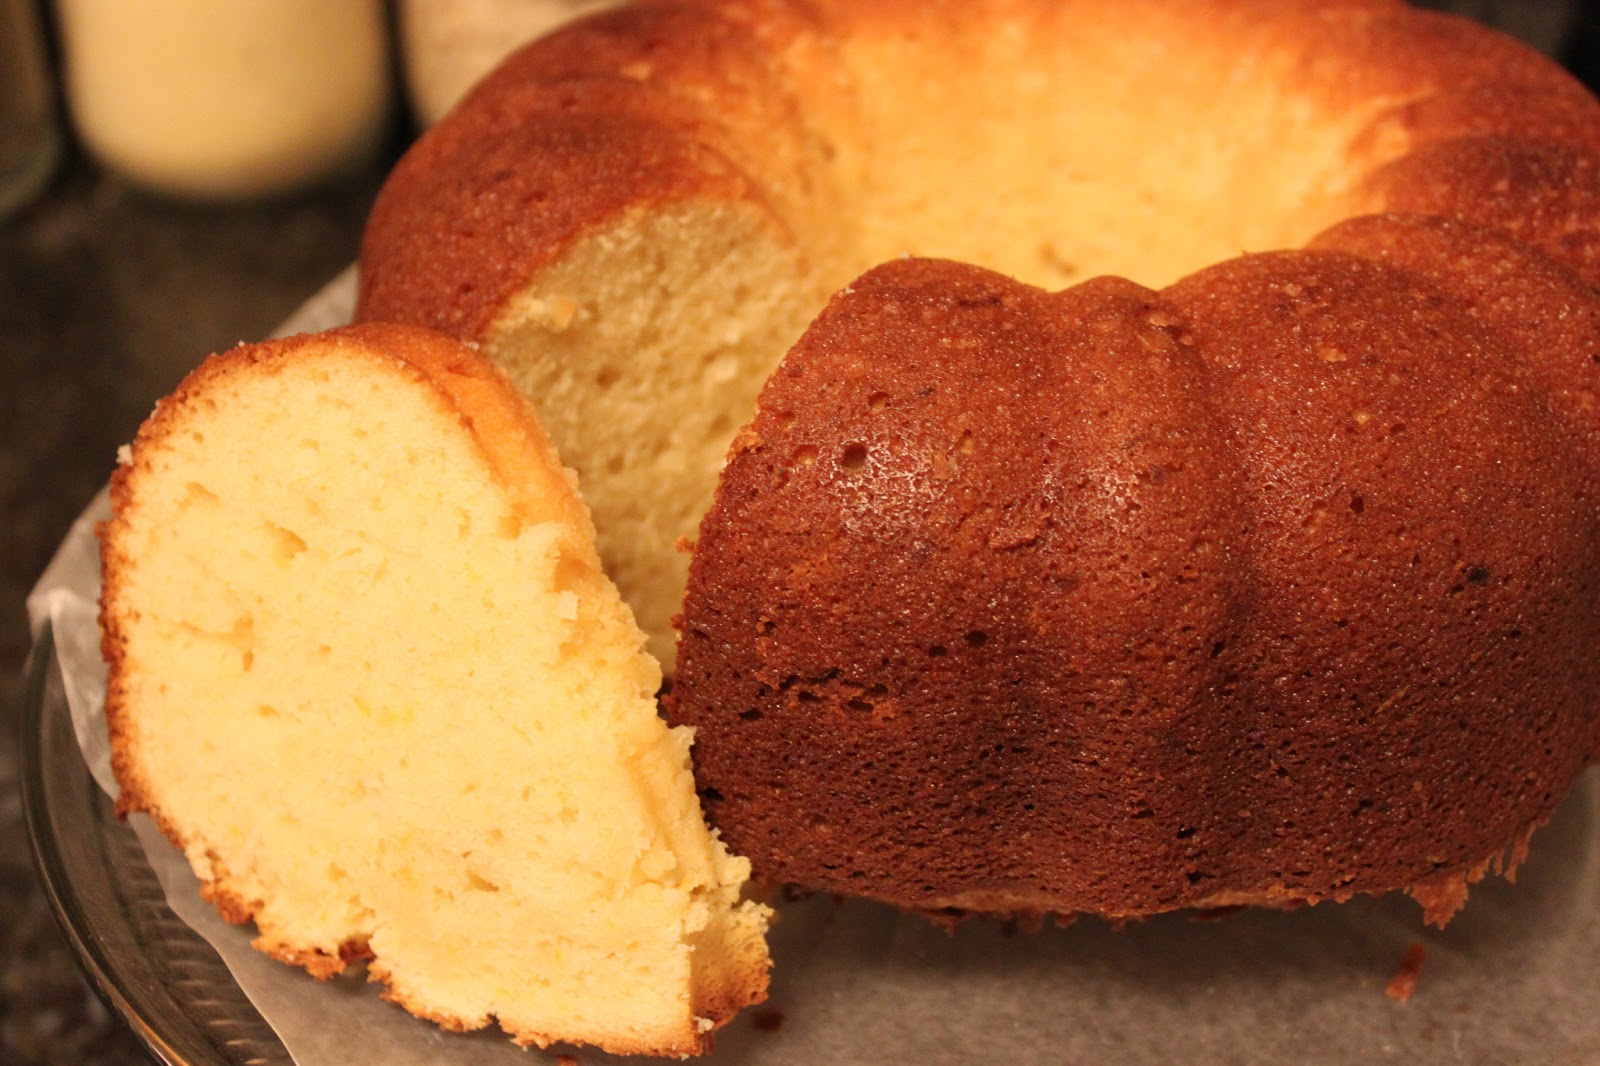
Lemony Coconut Pound Cake
Makes 1 bunt cake
Adapted from The Cutting Edge of Ordinary
1 c. butter, at room temp
6 eggs, room temp
8oz sour cream, room temp
3 c. sugar
3 c. flour
1/4 tsp baking soda
1 1/2 tsp vanilla
zest of 5 lemons
3 tbsp lemon juice
1/2 c. packed sweetened flaked coconut, plus 1/4 c. for sprinkling
Preheat oven to 350 degrees. Spray the heck out of a bunt pan. Or butter and flour. It's up to you.
In
a large bowl, cream the butter and sugar together. Add the eggs in one at a
time, beating each egg in completely.
Measure out the sour cream in a large measuring cup or small bowl. Fold the baking soda into the
sour cream. Add half of the flour and half of the sour cream into the large bowl. Beat well.
Add in the remaining flour, sour cream,
1/2 c. coconut, vanilla, lemon zest, and lemon juice. Mix until fully incorporated. Pour into pan and top with the 1/4 c. coconut.
Bake for 1 hour
and 20 minutes, or until a skewer inserted in the center comes out clean. Cool
in pan for 10 minutes, invert onto rack to cool completely. If you can wait that long.
You guys.
No, seriously. You. Guys.
These are quite possibly the best brownies on the planet. They taste like what what you want brownies to be.
Especially when you cover them with a large scoop of mint chocolate chip ice cream.
Honestly. I licked the plate.
Make these right now.
Mine took closer to 45 minutes than 30 minutes to bake, but the wait was worth it.
These brownies are not long for this pan.
We went up to the Lick Observatory on Saturday. It's about an hour away, and completely visible from most of the valley. The road to get up there winds its way over hill and dale, with 365 sharp turns (there's a sign at the top that says so). I was getting a little nauseous by the time we finally made it to the top, but the view was totally worth it.
I didn't take a picture - iPhone was trapped in the car. But it was nice. You should go.
On the way home, we passed our favorite Latin American grocery store. Mi Pueblo!
Of course we stopped. And we bought delicious delightful things.
Mr. S is still pinning after our trip to Mexico City, so I told him he was on salsa duty. I figured he'd come up with something good.
He did. And he decided that it was sharable with you all. Consider yourselves loved.
Start off by roasting onion, tomatillos, and garlic in a skillet.
Let them get all brown and caramelized. Delish.
Put them in a blender.
Add cilantro.
And avocado.
And a few rings of serrano pepper. Blitz.
Until it looks like a smoothie.
Add lime juice and salt. Blitz again.
Put in a bowl, cover and refrigerate.
Serve with chips! Or on tacos! Or eat with a spoon!
Arturo's Green Salsa
4 medium sized tomatillos, husked and rinsed
1/2 medium white onion
2 cloves of garlic, paper husk still on
2 avocados
1 bunch cilantro
1/2 serrano pepper, seeds
Juice of 1/2 a lime (or a whole lime if you like it limey!)
Salt to taste
Cut the tomatillos and the 1/2 onion in to quarters. Toss them and the still-papered garlic into a dry skillet over medium heat. Roast until brown and smelling delicious. Remove the garlic from the skillet and peel off the paper husk. Toss the garlic, onion, and tomatillos into a blender. Add the avocados, cilantro and serrano to the blender. Blitz until the mixture becomes uniform. Add in the lime juice and salt. Blitz to combine. Taste. Add more lime or salt, as needed. Pour into a serving bowl.
Cover and refrigerate for an hour or so. Serve as a dip for chips or a salsa for tacos.
Mr. S had a regression moment the other day. If I didn't know better I'd think he was 5 years old again and back in his parents' house in Jersey.
He looks at me with super huge eyes and says "I want chicken and dumplings. We need to call my mom."
So, being the fantastic wife I am, I procrastinated for several days.
He didn't forget.
"i want CHICKENANDDUMPLINGS!!! we need to CALL MY MOOOOOOOOM."
At which point, we both sat down at the kitchen table and rung up New Jersey. Thankfully, Mom was home. And she willing divulged to me the secret Mom S. addition. Ready??
Add dried parsley in the biscuit mix. Otherwise, it's the recipe off the back of the Bisquick box.
I think Mr. S's jaw hit the floor. He assumed that his mom's recipe came from some sacred place, probably close to the same kitchen that Julia Child created her recipes in.
So when I suggested that we opt for the Southern-style flat dumplings, he was totally ok with it. As long as they had parsley.
Mind you, he has since re-negged on his decision. There will probably be a fluffy-dumpling version made soon.
Just so you know.
We're going to start by boiling a chicken and reserving the broth. Just like we did for soup. See? Told you that was a basic skill. In a large pot, place the chicken, celery, onion,
bay leaves, and peppercorns. Add water until it just covers the chicken.
Boil for an hour, until chicken is cooked. Remove chicken from the
broth and set aside to cool. Fish all the veggies and spices out of the
broth and strain the broth through a fine mesh sieve or a coffee filter.
Put the broth back in the pot.
While the chicken is cooling, start on the dumplings.
In a large bowl, combine the cake flour, baking soda, and
salt.
Add in the shortening. Yes, I said shortening. Get over it. Using your fingers, work the shortening
into the flour. When worked in, the flour will form little pea-sized
lumps.
Don't forget to add the parsley!
Add the milk in a 1/4 c. at a time, mixing quickly to
incorporate.
Once the dough forms into a shaggy ball, roll it out to a
1/4" thick sheet. And I mean 1/4". You want them THIN!!
Slice into 1" wide ribbons. Slice those ribbons into
3" long pieces.
Move the dumplings onto wax paper and allow to rest and
harden for 30 minutes.
Using your fingers and a knife, pick the meat off the chicken. Chop the meat in to large chunks.
Once the 30 minutes for the dumplings is up, bring
the broth to a boil. Add in the carrots. One by one, drop the dumplings
into the boiling broth.
Stir gently, place the lid on at a tilt, and let
cook for 6 minutes. Be careful not to let it boil over!
Stir again, turn to medium low heat, and add the
chicken. Let cook for 15 minutes.
Add the peas and cook for another 5
minutes to thicken up.
Add salt and pepper to taste.
Southern Chicken & Dumplings
Makes one large pot
Adapted from Back To The Cutting Board
1 whole chicken
1/2 bunch of celery, roughly chopped
1 onion, quartered
3 bay leaves
10 black peppercorns
3 cups cake flour (or cake flour substitute)
3/4 tsp. baking soda
3/4 tsp. salt
1/2 tsp dried parsley
4 1/2 tbsp. shortening
1 cup milk
1 c. chopped carrots
1 c. peas
In a large pot, place the chicken, celery, onion, bay leaves, and peppercorns. Add water until it just covers the chicken. Boil for an hour, until chicken is cooked. Remove chicken from the broth and set aside to cool. Fish all the veggies and spices out of the broth and strain the broth through a fine mesh sieve or a coffee filter. Put the broth back in the pot.
While the chicken is cooling, start on the dumplings. In a large bowl, combine the flour, baking soda, dried parsley, and salt. Add in the shortening. Using your fingers, work the shortening into the flour. When worked in, the flour will form little pea-sized lumps. Add the milk in a 1/4 c. at a time, mixing quickly to incorporate. Once the dough forms into a shaggy ball, roll it out to a 1/4" thick sheet. Slice into 1" wide ribbons. Slice those ribbons into 3" long pieces. Move the dumplings onto wax paper and allow to rest and harden for 30 minutes.
Using your fingers and a knife, pick the meat off the chicken. Chop the meat in to large chunks.
Once the 30 minutes for the dumplings is up, bring the broth to a boil. Add in the carrots. One by one, drop the dumplings into the boiling broth. Stir gently, place the lid on at a tilt, and let cook for 6 minutes. Be careful not to let it boil over!
Stir again, turn to medium low heat, and add the chicken. Let cook for 15 minutes. Add the peas and cook for another 5 minutes to thicken up. Add salt and pepper to taste.
Serve!
I love stuffed mushrooms.
I have amazing memories of my parents making them for dinner parties when I was little. And me ignoring the guests entirely and eating far too many of them.
For some reason, I associate stuffed mushrooms with my dad, though I'm not sure if that's because he usually made them or if he usually got in trouble for eating all of them before the guests came. It could quite possibly be both.
In my house, stuffed mushrooms were an excuse to eat cheese and sausage. Jimmy Dean sausage to be exact. No mushroom really found its true purpose until it was overflowingly stuffed with sausage and cheese.
But I am now older. And I have friends that don't have that same idyllic love of ground pork that my parents instilled into me. Things need to be "vegetarian friendly".
Though that's by no means a downside. Cheese is still a wonderful thing. And there's walnuts. Mmmmm. Walnuts.
So while these are technically "vegetarian", they are also stinking delicious. No one needs to know that they are lacking in tasty animals.
Unless, of course, they don't like tasty animals. Then you can triumphantly tell them that these are stinking delicious. And vegetarian. Hah.
Start off with the mushrooms. Rinse the dirt off. Eww. Then use your fingers and pinch the stem. Twist slightly to pop it out. Once you figure it out, it goes really fast. Save the stems though. There's flavor there. Chop the dried out end off (aka the one that didn't come out of the mushroom cap) and dice the rest of the stem up. We're using it.
Let the cream cheese soften until it's at room temperature.
We happened to have a few of those red wax-covered babybel cheeses languishing in the fridge, so I diced them up and tossed them in with the cream cheese. You can use shredded mozz, monterey jack, or any other white cheese of your choosing.
Then add the mushroom stems, bread crumbs, chopped walnuts, smoked paprika, and cayenne.
Mix it all up and toss in the parsley and the garlic. Mmmmmm.
Spoon into the mushroom caps, mounding them a bit. Don't mound them too high or they'll melt over the sides of the mushroom cap.
Now for the incredible part - roll the filling side in parmesan shreds. This makes the nice crispy cheese crust on the top.
Bake for 25 minutes, and then turn the broiler on for 1-2 minutes, or until they are sufficiently brown on their tops.
Serve immediately. There should be no leftovers.
*****Update!
My illustrious Aunt Liz, chef extraordinare (No, really - she's an actual chef. Food runs in the family.) has made this suggestion:
Having made more stuffed mushrooms that I really care to think about, let me pass on a little tip that I was shown many more years ago than I really care to think about either: After removing stem, but before stuffing, poach the cap. I usually use half white wine, half water. This keeps the caps from drying out in the oven, so your finished product doesn't look all wrinkledy. I get the liquid steaming and pop the 'shrooms in for just a couple of minutes. Pull them out and drain open cap side down. Then have at it with the stuffing. There is marginal favor added, this is mainly for looks.
Thanks Aunt Liz! I'll try that next time.
And people - you realize that if she's just chiming in now, it means that I've probably done everything else on the blog somewhat close to the way it should be done... Eeeee! Wahooo!
*******End of update!
Vegetarian Stuffed Mushrooms
16 baby bella or white button mushrooms
1/2 block of cream cheese, softened
1/4 c. bread crumbs
3 babybel cheeses, diced (or a scant 1/4 c. of whatever white cheese you have around)
1/4 tsp cayenne pepper
1/3 tsp smoked paprika
3 tbsp chopped walnuts
1 large clove of garlic, diced
1 tbsp fresh parsley, chopped
1/2 c. real parmesan cheese shreds
Salt & pepper to taste
Preheat the oven to 350 degrees. Rinse your mushrooms. Using your fingers, pinch the stems and twist slightly, popping them from the center of the mushroom where they're attached. It's easy once you get the hang of it. Save the stems. Slice off the end of the stem that was previously cut (aka not the end that just came off the mushroom cap). Dice the remaining stem.
In a medium-sized bowl, combine the 1/2 block of cream cheese, mushroom stems, babybel cubes, bread crumbs, cayenne, smoked paprika, and walnuts. Stir until well mixed. Add the parsley, the garlic and the salt & pepper, mix till fully incorporated.
Use a spoon to mound the mushroom caps full of filling. Pour the parmesan out on a small plate. Roll the filled side of the mushroom cap in the parmesan. Place on a lined baking sheet. Bake for 25 minutes. If you want the tops to be golden, turn on the broiler and brown for a few minutes.