Friday, March 30, 2012

Black Pepper Bacon Waffles


Mr. S's birthday was a little while back. I had single-handedly organized a Saturday basketball-watching party, cleaned house, and done all the preparations to make snacks. That morning, although I had also planned a little breakfast fun for just the two of us, apparently it was too much. I had a minor meltdown. No breakfast fun was had. Instead, there was huffing, puffing, and much couch sitting. Meanwhile, Mr. S went running and promised that he didn't mind one bit that he had to eat cheerios for breakfast. 

So last weekend, I redeemed myself. Since I got Ms. Joy's Book, it's all been roses and marshmallows.  (Almost)

You guys need to get this book. Seriously.


These were super easy - I could get everything ready ahead of time, mix it all together at the end, and produce a glorious comeback waffle. Hah.

Step one - cook the pepper bacon 


Step 2 - mix the drys


Step 3 - mix the wets 


Steps 4 & 5 - chop bacon, mix wets, drys, and bacon


Using my cyclopian waffle maker, I need a 1/2 c. of batter...


...to produce beautiful waffles.


And once again, Megan triumphs!

Black Pepper Bacon Waffles
Makes 6 waffles
Adapted (barely) from Joy the Baker

For the Bacon:
6 slices thick-cut bacon
1 tsp fresh cracked black pepper

Preheat the oven to 375 degrees. On a lined baking sheet, lay out bacon in a row. Sprinkle with pepper. Bake for 10-12 minutes, until brown and crispy. Allow to cool.

For the Waffles:
1 1/2 c. flour
1/2 tbsp baking powder
1/2 tsp baking soda
1/2 tsp salt
1/4 tsp fresh cracked black pepper
2 tbps brown sugar, packed
2 eggs
1/3 c. vegetable oil
1 tsp vanilla
1 1/4 c. buttermilk
Bacon from recipe above, chopped into bite-size chunks

In a large bowl, mix together flour, baking powder, baking soda, salt, pepper, and sugar. In a medium bowl, whisk together eggs, oil, vanilla, and buttermilk. 

Plug in your waffle iron and get it hot. Once you're ready to waffle - mix the wet ingredients and the chopped bacon into the large bowl with the dry ingredients. Mix until just combined. Lumps are totally ok. 

Put the proper amount of batter in your iron and cook till done, as your waffle iron says. Serve immediately with butter, maple syrup, a few slices of extra bacon and a barely fried egg...


...and you have a very happy husband. 


Wednesday, March 28, 2012

Avocado Pound Cake


I got a new cookbook. Joy the Baker's debut, and man is it awesome. Full of those recipes where you say - "Wow! I never would have thought of that, but boy does it look good."

The first thing I had to try was the avocado pound cake. It's super easy, and definitely fun to make. I mean, come on - the batter is GREEN. 

My only major problem came in keeping the page open to the recipe I needed. Since most of my recipes come from the internet or an ancient cookbook from my shelf, keeping the recipe visible hasn't been a problem. But with a bit of ingenuity, I managed to make do.


I just had to make sure I had everything I needed out of the cabinet first....

Start with the avocado - mush mush mush


It took me 3 avocados to get the 1 c. plus that the recipe called for.

Next, butter and sugar. Cream it till fluffy. Be sure to use the largest bowl you own - Joy suggests using the KitchenAid instead of an electric beater, and I'm now certain that's more to do with bowl size than anything else.


Add the avocado, and the fun begins!


Perhaps I'll make this cake again around Christmas. The little cousins will love helping to make it! Maybe add some strawberries. Or something else red.

Add the eggs, one at a time, beating well after each.

Then mix in the vanilla.

Next, in a separate bowl, mix up the dry ingredients. 


Add half the drys to the green batter, mix them in, and then add the buttermilk. 


Mix it all up, and add the last half of the drys.  Beat until just incorporated. Enjoy the green now, friends, cause it will soon be gone. 


Pour into 2 greased loaf pans and place on separate racks in the oven. 


Bake until golden and no longer gooey in the center (use a knife or straw to test). Remember to rotate pans halfway through...

Let them sit for 20 minutes in their pans to cool, then attack with the zealousness of a 3 year old...


A 3 year old with good knife skills.

Avocado Pound Cake
Makes 2 loaves
Adapted (barely) from Joy the Baker

1 c. plus a couple tbsp avocado (I used 3 avocados and got around that amount. It all went in.)
3/4 c. butter, softened
3 c. sugar
4 eggs
2 tsp vanilla
3/4 c. buttermilk
3 c. flour
1/2 c. cornmeal
1/2 tsp salt
1 1/2 tsp baking powder
1 1/2 tsp baking soda

Preheat the oven to 350 degrees. Have your oven racks in the middle and the top third. 

In a medium bowl, smoosh the avocado. In a humongous bowl (or a KitchenAid if you've got one), beat the butter and sugar until fluffy. Add in the avocado and mix for several minutes. Be sure to scrape down the bowl so it's all mixed in. 

Add the eggs, one at a time, mixing well after each addition. Add in the vanilla with the last egg. 

In a medium bowl, whisk together the flour, cornmeal, salt, powder, and soda. Add half of that to the avocado mixture, and beat it in well. Pour in the buttermilk, mix it in with the beater. Then mix in the last of the flour mixture, beating until it's just incorporated. Scrape down the bowl as necessary. 

Pour the batter into 2 greased loaf pans. Bake on separate racks for 30 minutes, then switch the pans and bake for another 30 minutes or until a knife inserted comes out clean. Let sit in the pans for 20 minutes to cool before moving the cakes to a cooking rack. 


Serving suggestion - grill the cake slices and serve with fruit and cream.... I would have done it myself but the plain cake just disappeared too quickly!


Sunday, March 25, 2012

Salmon with Roasted Tomatoes, Potatoes, and Olives


Salmon is delicious. I could eat it almost every day. I could also eat bacon almost every day. But salmon is much healthier and definitely more socially acceptable. So, salmon. Salmon I could eat almost every day!

Mr. S seems to be quite happy with salmon as well. He's in the midst of training for a half marathon, so he's further inclined to eat healthy. No more bacon for us! At least until I sneak it into something. I'm guessing this will last about 24 hrs. Then it's back to bacon. Perhaps I'll wrap salmon in it. Woooooah - Mind. Blown. 

In any case - normal, healthy salmon. This is our new favorite way of cooking it. (Until I perfect that bacon method)

Chop up potatoes and an onion into largish hunks. Toss in a box of grape tomatoes.


Carve off large hunks of orange (or lemon) zest. Make sure you get rid of as much of that white pith as possible. It should be easy to see the orange's little pores. Yes, pores, like the ones you've been worrying about on your nose. Oranges appear to have them too, but under the skin.


Slice the zest chunks into thin ribbons. Add to the bowl. Toss in a tablespoon or so of olive oil and some salt and pepper. Gently, coat everything and pour out in a single layer on a lined sheet pan. 


Roast for 45 minutes at 400 degrees.

While that's cooking, cut your kalamatas in half and toss with olive oil and chopped fresh rosemary. Add some sliced garlic too. Even if it's not in the photo.


When the tomato mixture is roasted, pull it out of the oven and scootch everything out of the middle. Place your salmon fillets there (I just bought one big one), and cover the fish with some of the olive mixture. You can toss on a few tomatoes as well. Just make sure the top of the salmon has been well oiled. Mix the rest of the olives in with the other stuff on the pan.


Bump the oven up to 450 and cook for 10-12 minutes, or until the salmon is done.

When salmon is done it has white fat ooze visible. Like this:


No ooze - no go.

Once it's done, plate and serve! Delicious!


Salmon with Roasted Tomatoes, Potatoes, and Olives
Serves 2 (or 4 or 6. Just get more fillets and up the veg)
Adapted from Eating Well

2 salmon fillets (as much salmon as 2 people need)
1 carton grape tomatoes
2 medium red potatoes, cubed
1 small onion, cut in large hunks
Zest of 1/2 an orange or lemon, carved off with a knife an sliced into thin strips
3 garlic cloves, sliced
3 tbsp olive oil, separated
1/3 c. kalamata olives, halved
1 tsp finely chopped fresh rosemary
Salt and pepper to taste

Preheat oven to 450 degrees. In a large bowl, mix tomatoes, potatoes, onion, zest and 2 tbsp olive oil. Add salt and pepper to taste and toss to coat. Pour out the mixture on a lined sheet pan. Roast for 45 minutes, until nice and brown. 

In the meantime, mix the olives, rosemary, garlic and 1 tbsp olive oil in a small bowl. Pat dry the salmon fillets.

When veg is done, remove the pan from the oven. Then, using a spatula or spoon scootch the veg over so that you have 2 spots open in the pan for the fillets. Lay the fillets on the pan, skin side down if your salmon has skin. Cover the salmon with the oil and olive mixture, making sure that the fillets are coated with the oil/rosemary mix. Toss some of the tomato mixture on the top of the salmon too, mixing the olives into the rest of the veg.

Roast for 10-12 more minutes, until the salmon is oozing white. Plate and dine!

Friday, March 23, 2012

Chickpea & Caraway Flatbread


I wasn't kidding when I said it was the week of the chickpea. We're going all out! 

Chickpeas have been used in dips for eons. In multiple cultures, even. However, in a bread, my friends? I think not. So, what should you be serving with your roasted red pepper hummus or chana masala, but chickpea bread?

Ok, fine. I will admit that breads have been made for a long time using chickpea flour. But I didn't have any of that. And it was super expensive at the grocer. But I did have the canned form.

Besides - this stuff is so super tasty, I have no intention of keeping the recipe from you!

Enter - the blender. 


Blitz those suckers to bits. Pulverize!

Then get your dry goods in order. Yeast, flour, salt. 


Next, the wets. Yogurt, honey, olive oil, caraway seeds, and the beyond-mashed chickpeas. 


Add the water an mix the wets up. Until you get a soupy substance.


Mix the wets into the drys and you get a nice and sticky dough. You may have to add a few tablespoons of water to reach optimum dough texture. 


From here, your options here are: (1) cover with plastic wrap and let sit in your fridge for 8-10 hours or (2) let it set for 2 + hours now, to rise until doubled in size. 

I chose option (1), and then took it out and let it rise for an hour in a warm oven. It doubled just fine. 


Next, cut the dough in half. Toss some flour on a sheet pan and stretch the dough out into an oblong shape. 


Drizzle with olive oil and rub it lightly over the top of the dough, making sure it's all covered. 

Let the dough rise on the pans for 20 minutes or so (while your oven heats up to 475). This is important, don't skip it! If your dough is thin and doesn't rise, you get cracker-like bread. If it's thicker and you let it rise, you get more focaccia-like bread. Your choice.

Cook until lightly brown on top (10-15 minutes). 


Cut into triangles and serve with hummus. Of course!


Chickpea & Caraway Flatbread
Makes 2 loaves
Adapted from Taste of Pearl City

1/2 c. canned chickpeas, blitzed in a food processor till mostly smooth
300 g (about 2 c.) flour
1 tsp rapid rise yeast
1/2 tsp salt
1 tbsp yogurt
2 tsp honey
1 tsp caraway seeds
1 tbsp olive oil (plus more for brushing the tops)
1/2 c. (+ a few tbsp if necessary) warm water 


In a large bowl, combine flour, yeast, and salt. In a medium bowl, combine chickpeas, yogurt, honey, olive oil, caraway seeds, and water. Mix wets into drys to create a sticky dough. If dough doesn't come together or isn't sticky, add water by the tablespoon until the mixture is right. Grease the sides of your bowl with oil or shortening, and cover with plastic wrap.

Allow to rise for 2 hours, or until doubled in size. Cut dough in half and stretch each half into an oblong shape on a floured baking sheet. Drizzle with olive oil, brushing to coat top. Cover and let rise again, 20 minutes or so while your oven preheats to 475 degrees.

Bake at 475 for 10-15 minutes, or until golden brown. Rotate pans from top to bottom racks half way through.


Wednesday, March 21, 2012

Chicken & Chickpea Burgers


Apparently it's the week of the chickpea. Or, if you prefer, garbanzo. And I do, mostly because I feel like one of those old-timey vaudevillians when I say "Gar-BAN-zo," loudly and with emotion. Ok, ok. Maybe I should stick to chickpea.

In any case, back to the burger. It's good. And simple. I made chicken sausage again last week (chickens were on sale), and was trying to find another use for it. I also had a can of chickpeas. A great idea was born!

First, mash up those chickpeas. 


You can either blitz them in a food processor for a few seconds, or smoosh them with a fork. I chose the fork option. You want to get most of them split, but if a few are whole, it's not a big deal. 

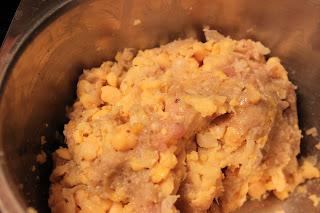
Then you toss them in with your chicken sausage. Or plain ground chicken. That works too. You'll just have to spice it up. 


Chop up some green onion. Cause there was some on the counter. Toss it in, and add in any other spices you want at this point.


If you're headed Italian, try adding rosemary and sundried tomatoes. If going Mediterranean, perhaps some kalamata olives, sumac, and dried apricots. Toss in oregano or basil or dill. It's really up to you. 

Make up patties and fry them in a skillet.


I made a baby patty for snacking. Gotta look out for the chef. 

Flip them once they are all good and brown on one side. 


My pan is big, but my burner is small. Such is life. 

You may need to tent them with aluminum foil to ensure doneness.


Or, use a lid that fits your skillet. We don't have one of those. Thus the foil.

While the burgers are cooking, prep your buns. Hah. Buns! Hee, hee, hee. Sorry. Apparently I just turned into a 4th grader. Give me a sec. *Ahhhh* Ok. Back. 

I found some ciabatta rolls at the grocer which worked perfectly as *snicker* buns. They just needed to be cut in half.

Next, mix some mayo with a teaspoon of hotsauce. We found this fabulous one made by local firefighters. It's really smoky and awesome. They sell it online here, as well as around locally. And all proceeds go to charity. I know we'll be buying more!


Schmear on a healthy amount of spicy mayo. Then top with baby spinach. Or arugula. I won't judge. 


Place your perfectly cooked patty on the bun, and layer on a few thick slices of tomato. 


Your burger is done! What a beauty. And healthy too!


Chicken & Chickpea Burgers
Makes 4 burgers

12-14 oz chicken sausage (or ground chicken)
Spices (it's totally up to you)
1 16 oz can of chickpeas/garbanzos
2 tbsp chopped green onion
4 ciabatta rolls (or whatever bun you prefer)
2 tbsp mayo
1 tsp hot sauce
thick cut tomato slices for topping (optional)
baby spinach for topping (optional)

Mash up your chickpeas in a food processor or with a fork so that most are split, but a few are still whole. Mix chickpeas with chicken sausage. Add chopped green onion and other spices as desired. Form into patties. Cook patties in a large skillet over medium-high heat, 3-4 minutes a side, until nicely browned. Tent with foil or a lid for last few minutes of cooking time. 

Cut buns in half. Toast them if you'd like. Mix mayo with hotsauce and generously spread on top half of bun. Add toppings (tomato and spinach, or whatever else you want). When patties are done, assemble the burger and enjoy! 

Goes great with sweet potato fries. Mmmmmm. I'll have to leave that for another post.